Welcome to the first step in getting your blog organized! Creating a master spreadsheet will not only keep you organized, it will also help increase the pageviews. Guaranteed!
I’m so excited to bring you this series in blog organization! This first step is going to get you started off on the right foot to blogging success.
Creating a master spreadsheet is what I believe to be the most important part of blog organization. This spreadsheet is going to be your #1 help in keeping track of where you are sharing all of your posts and what groups you’re dropping your links. I prefer to make a Google spreadsheet in my Google drive and keep all my blog files and spreadsheets in that same place.
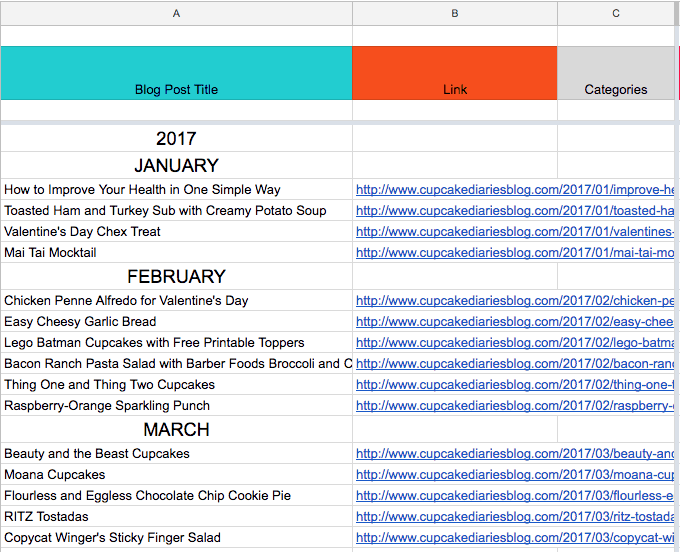
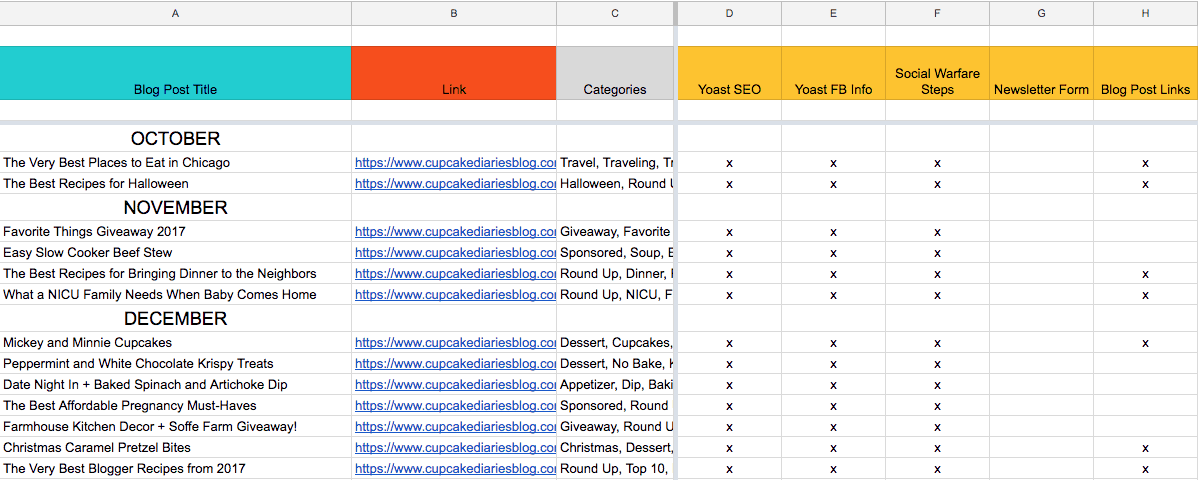
Once you’ve opened a new Google Sheet, you’re going to add your blog posts. Each column has a letter above it starting with A. More letters will be added as you add columns.
The first three columns are going to be called:
- Blog Post Title
- Link or Blog Post Link
- Categories
(Obviously you can call them whatever you’d like, but these work well for me.)
I like color so I filled the boxes in with different colors.
Blog Post Title & Links
Now that your columns are made, the tedious part comes next: adding all of your blog posts. If you’re brand new at blogging, this is going to be really easy. If you’ve been blogging for a while and have hundreds of posts, this is where you’re going to want to put on The Tonight Show and get typing. You’re going to type the name of each recipe in the Blog Post Title column and copy and paste the URL with a link to each blog post in the Link column.
To add the clickable link, click on the cell (box) with the URL you just pasted and click the Insert Link button at the top of the page. You can paste the URL right into the box that pops up. Then click Apply.
Categories
The third column is for Categories, the key terms you can search in your spreadsheet to find each post easily. For example, if you want to promote your Christmas posts and want to find them easily on the spreadsheet, Command+F on the Mac keyboard will open up your search box and you can type in the word Christmas. Those key terms in the Categories column will all pull up and you can easily find each post you want to promote.
To keep your spreadsheet clean and organized, label each section of posts by year and month, as seen above.
Blog Post Tasks
The next columns are going to be the different tasks you want to complete before hitting the Publish button on a new blog post. This will likely be different for you, but most of them are key factors of a blog post to help it get seen more and to get the most out of each one. Here are mine with a description of each:
- Yoast SEO – I use Yoast SEO to help me determine whether or not my post is going to do well on search engine ranking. I get a green, orange, or red light depending on my keywords and descriptions. The ultimate goal is to get a green light.
- Yoast FB FB Info – This is also part of Yoast SEO. After I’ve gotten the green light on SEO, I click over to fill in the details I want to show up when someone shares my blog post link on Facebook. An image and description show up when this happens and I want to have control over what image it is and what the description says. It is here that I fill in that information.
- Social Warfare Steps – Social Warfare is a WordPress plugin that helps increase social shares and drive people to your site with pretty social share buttons. With the pro version you not only customize your buttons, you can also choose what you want to pull up when readers click on the share buttons. You can customize tweets, choose a Pinterest image for people to pin, and more!
- Newsletter Form – I have a weekly newsletter that comes out every Monday morning. One way I get more subscribers is by inserting a newsletter form into the bottom of each of my blog posts.
- Blog Post Links – I like to add links and photos to other blog posts that I think my readers would like to see since they are looking at that certain post. Kind of an “If you like this, you might like these” sort of thing. The idea is to keep people on your site so no matter which blog post they click to, they will be able to find more of your blog posts at the bottom.
- Tags/Categories – This is a way for you to sort and group your blog posts so if a reader is in your categories and clicks on one of them, all of the blog posts in that category will show up. Tags are the specific details of your post.
- Amazon Links – As an Amazon affiliate, I like to occasionally place affiliate links in my blog posts to promote products I use and love while creating my recipes.
- Affiliate Disclosure – This is the disclosure I use at the bottom of the post so my readers know the post contains affiliate links.
- Related Posts – I use the WordPress plugin Related Posts by Zemanta to display related posts at the bottom of each of my blog posts. These display in the form of clickable thumbnails that I can choose and customize.
- Long Pin – These are the pins that are long in shape with multiple images and texts. Research has shown that these pins do the best on Pinterest and I try to include one in every post. My long pin is sized 550×1350 and I place it at the bottom of the blog post. You can see an example of that HERE.
- Header Image – When I changed my WordPress theme it required that I have a header image for each blog post. There is a specific size this needs to be so it is important I get this part into my post.
- Recipe Index – All of my recipe posts go into the Recipe Index for my readers to find them. I also have printables and party ideas in my Recipe Index.
- WP Recipe Maker Layout – I am currently using WP Recipe Maker for my recipe card and include one per recipe post.
- Updated Sponsored Post – I like to make certain changes to sponsored blog posts once they are outside the contract window. A lot of sponsored posts can’t include outlying links to things like affiliates and other blog posts, and they often include contests and coupons that eventually become outdated. I like to go through each of these blog posts and add links and remove anything that isn’t relevant.
Social Media Columns
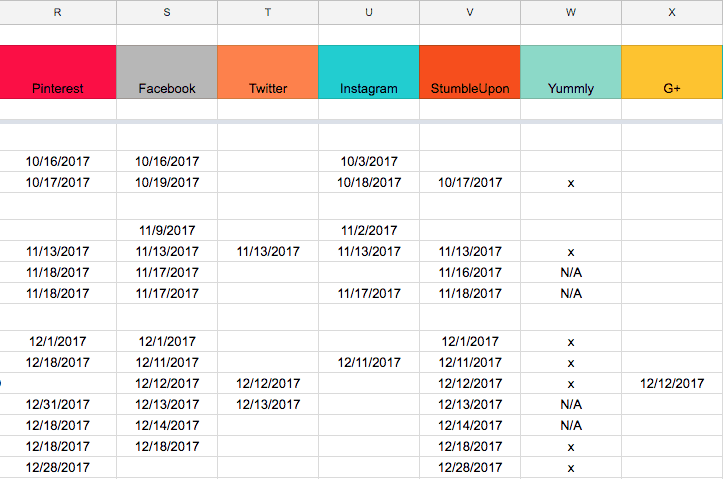
The next group of columns is for all the social mediums you plan to share these blog posts. Add any area of social media that you plan to ever post your blog post links.
By now you’re way down to the end of your spreadsheet. If you need to add more columns, click on the last column then click Insert > Column Right. I made mine more colorful to break them up from my gold blog post to-do columns.
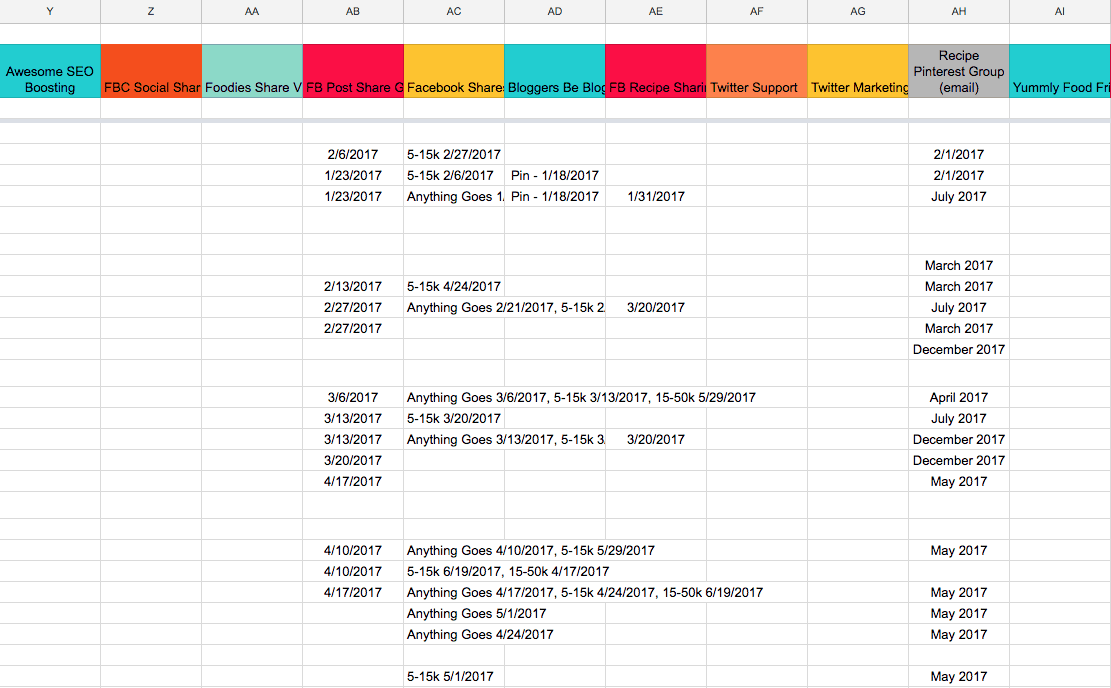
The remaining columns will be for all of the Facebook and other blogger groups you participate in. Give each group its own column.
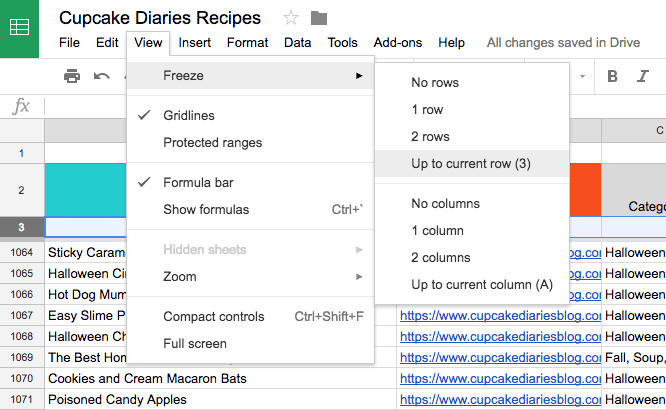
That is one long list of blog posts, so it’s a good idea to freeze that top row so you can always see your column names. To do that:
1 – Click on the number line where all your column titles lie, or the line below like I have mine, so they are all highlighted.
2 – Click View > Freeze > Up to Current Row (3)
Now when you scroll down to each of the posts you will still be able to see all of the column titles.
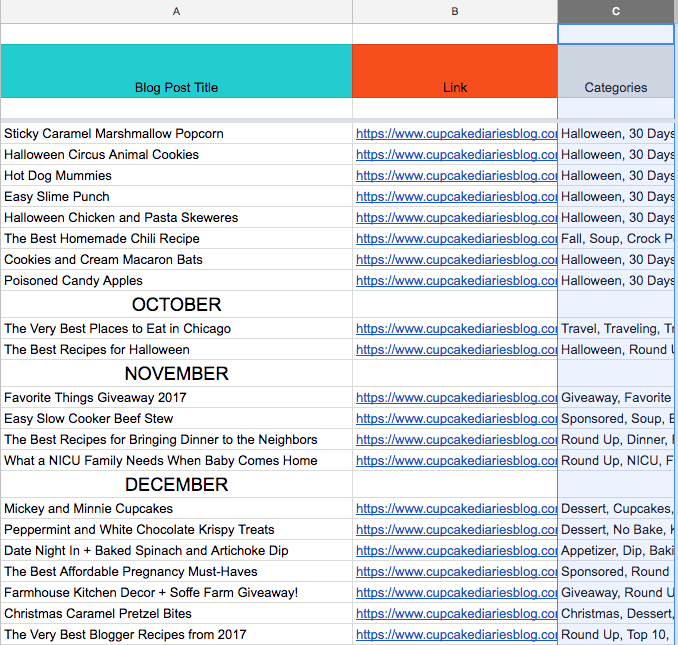
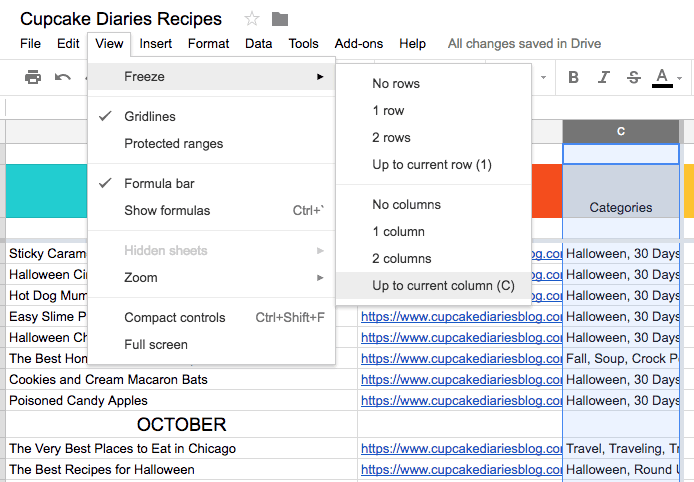
I also like to have the blog post titles, links, and categories frozen so I can scroll across to all of my different social media, Facebook groups, etc. The technique is the same as it was when you froze the rows:
1 – Select Column C (or whatever your Categories column is under) so all of those lines are highlighted.
2 – Click View > Freeze> Up to Current Column (C)
Now when you scroll to the right to see all of your social media and groups your Blog Post Title, Link, and Categories columns will stay put.
Your spreadsheet is done, now what in the world are you going to do with it? The purpose of the spreadsheet is to keep track of everything that will happen with your blog posts.
Let’s start with the individual blog post tasks. Once I get the different components finished for my blog post, I go into my master spreadsheet and mark an x for each one. I clearly have some work to do on a few of those columns! But this spreadsheet helps me keep track of what I still need to do for each post.
If I’m in a hurry and can only get a certain amount of tasks done, I mark what I have done and can go back later and see what else I need to do. Because it’s all in my spreadsheet!
Once that blog post is published and all the post tasks are finished, it’s time to push it on social media. Every time I share each post on social media I mark the day that I’ve shared it so I know when it should be shared again and can see if I forgot to do it when I first published the post. This also helps me know which social channels I need to do more on. Twitter and Google+ seem to be my weak spot! haha
Heading further to the right on our spreadsheet! In Facebook and other groups, there are a lot of opportunities to share links, drop pins, etc. For these groups I like to leave the date that I shared the links, pins, etc so I’m not using the same links over and over again, know that I’ve already used the link before, etc.
Not all of my groups have link drops in them, but there is still a space available if link drops are ever an option or if I need to make any notes about the group.
And that’s all there is to it!
Up next, Part 2:
Organizing Your Computer
This post contains affiliate links. I include these links to help you find the products that I used in the recipe. If you purchase an item from the link, I will receive a small commission helping keep my recipes free for you. Thank you for your support!
- Ghost Krispy Treats - September 1, 2024
- 14 Days of Valentine’s Day with FREE Printable Tags - January 20, 2023
- The Very Best Appetizers for New Year’s Eve - December 17, 2022
